What is a duress alarm? #
A duress alarm or panic button is a safety device used to assist people in an emergency or dangerous situation. Unlike most security devices, these alarms are not for buildings or objects, but for people’s individual use. They can be used to track people’s whereabouts, check their well-being, or as an alert when in dangerous situations.
Duress alarm systems consist of wireless mobile devices that keep people connected to resources that can help them. These devices generally have a very simple design to serve their straightforward purpose. Panic buttons can be discreetly integrated into the environment, minimizing the risk of escalation in dangerous scenarios.
While different alarms feature unique buttons or layouts, the main idea is to have an emergency button to press in stressful situations. Pressing the panic button will alert the person or service on the other end of the alarm so they can send help.
Watch the video below for more information on panic buttons, their benefits, use cases, and installation tips.
When to use a duress alarm #
Duress alarms are used across many different industries and scenarios. Their most common form is the panic or emergency button. You can use a duress alarm in any environment that poses potential threats or dangers. Having a panic button is essential in workplaces with potentially hazardous environments.
Duress alarms are often found in hospitals, nursing homes, and medical facilities to ensure patients can get immediate help if something happens to them when alone. These systems are also found in industrial and factory environments, municipal buildings, and government facilities.
Security guards and delivery personnel that work regular routes may also use duress alarms to keep people in touch with their location and alert their colleagues if they encounter a threat. Panic buttons are often installed near cash registers or in discrete locations within a retail store in case of theft, robbery, or any threatening situation.
Duress alarms are an invaluable resource in any situation with potential harm to an individual, as they can alert others to get help as soon as possible.
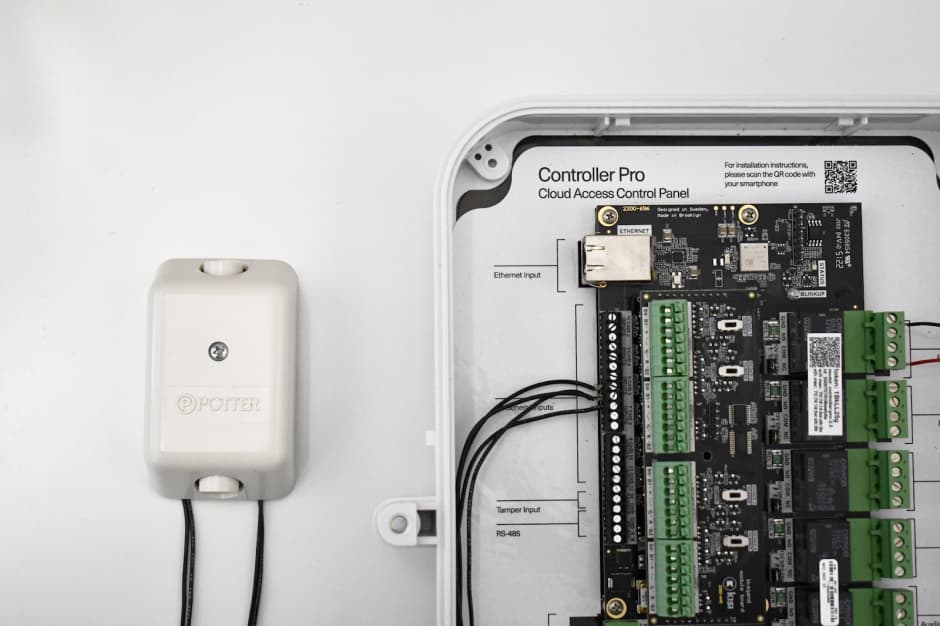
To integrate your panic button with Kisi, you will need:
- Kisi Controller Pro
- Panic button like the Potter Hub-T
- A spare relay to connect a siren (can be added later)
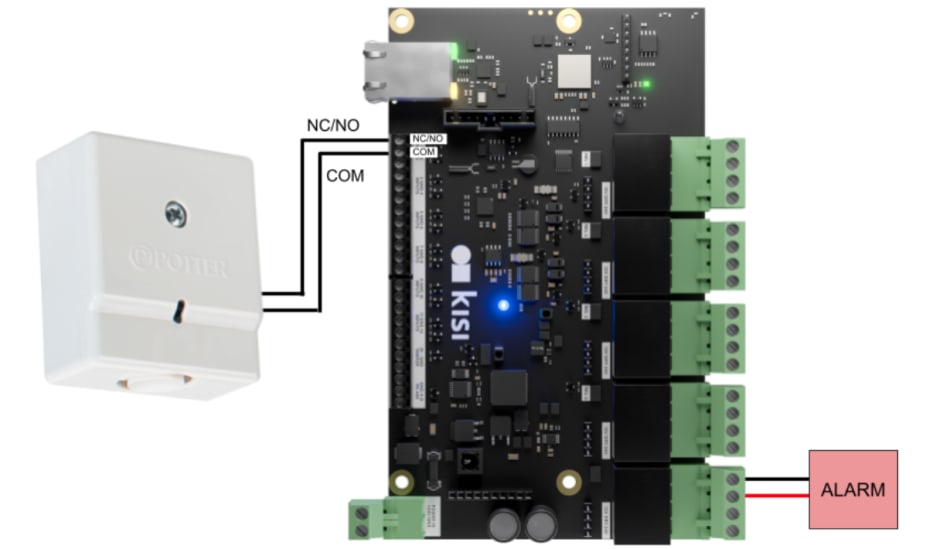
- Unplug the power to the Kisi Controller Pro before wiring.
- Identify the general inputs located on the left side of the controller. Note: Two IN (Input) pins share one GND (Ground): IN1, GND, IN2, GND, IN3, etc.
- Refer to the panic button manual to identify the COM (Common) and NC/NO (Normally Closed/Normally Opened) wires on the panic button. Note: Depending on your panic button, you may have a hold up switch, allowing a different trigger function if someone simultaneously presses the two buttons. Refer to the manufacturer’s manual to wire this.
- Wire the GND (Ground) pin of the controller to the negative or COM (Common) wire of the panic button.
- Wire the IN (Input) pin of the controller to the positive or NC/NO (Normally Closed/Normally Opened) wire of the panic button.
- Verify that all connections are secure and there are no loose wires.
- Go to web.kisi.io.
- Click on ‘Places’ and select your current place.
- Click on ‘Doors’, ‘Add Door’ and create an arbitrary door for the panic button.
- Return to the left tab and, click on ‘Hardware’, ‘Controllers’, and select the controller the panic button is wired to.
- Scroll down to ‘Inputs’ and select the input number the panic button is wired to.
- Under ‘Type’, select ‘Request to Exit’.
- Click on ‘Search Door’ and select the previously created arbitrary door for the panic button.
- Click on ‘Duration’ and type in an arbitrary small number.
- Under ‘Action on Access’, select ‘Unlock door’.
- Under ‘End of Line Type’, select the option that matches your wiring.
- Enable the toggle.
- Click ‘Save’.
- On the left tab, click on ‘Intrusion Detection’.
- Click ‘Add Zone’ and type a name for this panic button.
- Under ‘Alarm Type’, select the alarm type that matches your setup. Kisi Intrusion Detection: The alarm siren is directly wired to the Kisi Controller on a spare relay. 3rd Party Alarm Integration: A third-party alarm control panel is wired to the Kisi Controller.
- Scroll down to ‘Doors’ and click ‘Add Door’. Click on ‘Search Door’ and select the arbitrary panic button door. Keep ‘Exterior Door’ toggled off and click ‘Add’.
- Click on ‘Alert Policies’ and type in the email of anyone this panic button should notify.
- Click on ‘Hardware’ if you plan on wiring an alarm siren to the panic button. If using Kisi Intrusion Detection, under ‘Siren Relay’, select the relay the siren alarm is wired to. Under ‘Arming Delay’, define how long the alarm controller should wait before arming.
- Under ‘Alarm Schedule’, configure the schedule for when this panic button should be active. Define the ‘Start Time’ and the ‘End Time’ and select ‘Away’ under ‘Default Mode’. Under ‘Override on Access’ select one of the two options: ‘None’ or ‘Disarm’: alarm is deactivated.
When a zone enters policy violated state, notifications are sent to chosen recipients or admins, and if installed, an alarm siren is triggered. When the default mode is overridden or when the alarm is triggered, as a Kisi admin, you can reset the zone to the default mode from the zone list.
A duress alarm is generally activated via a button. This button is often linked to a monitoring center that provides a duress alert when someone presses the button. These buttons vary for each device.
You can activate the alarm manually, automatically (common in a man down alert), silently, or audibly. As soon as the button is activated, it sends a signal to the monitoring party. This notifies them of the location of the alarm and what kind of situation it is.
Duress alarms types #
Duress alarms vary according to the kind of situation they are intended to be used in. In the most common and simple form, a duress alarm features an emergency button. This button can be pressed in times of need to alert responders on the other end of the alarm. Responders can then use the duress alarm to locate the person in danger and help them.
Other duress alarms feature a two-way system, meaning those receiving the alert can check in with people on the other end and vice-versa. This type is often used in situations where workers need to check in with headquarters while out on the job.
Two other features found on duress alarms are a “no response” feature and a “man down” button. No response alerts occur when the person equipped with the alarm doesn’t respond in a certain time period, alerting the headquarters of their absence. The man down feature alerts if someone is unconscious or incapacitated, signaling the need for help.