What are access control panels? #
The main function of an access control panel is to unlock a door. They mainly differentiate in other features, like how secure unlocking the door is, how well it’s documented, and how controllable it is.
You should pay attention to the following five main access control panel aspects.
- Access control panel type: Sometimes, alarm panels are mistakenly perceived as access control panels. Other types of panels include reader panels or extension boards.
- Door contact relays: While this might seem trivial, there are a lot of different relays. The main difference between relay types is wet vs. dry contact relays. The number of available relays also tends to differ between panels. Standard panels have between two and eight relays. For instance, the Kisi Controller Pro 2 offers four dry or wet relays you can wire to door security hardware.
- Power supply rating: This is a critical factor in ensuring proper and reliable system operation. The power supply rating refers to the specifications and capacity of the power supply unit or power source that provides electrical power to the different components of the access system.
- Alarm input: Even though you can connect most alarm devices directly to a power supply, some access panels offer the possibility to connect alarm systems directly to the panel. For instance, the Kisi Controller Pro 2 offers one dry or wet relay you can wire to intrusion detection hardware, like a siren or a third-party alarm system. When you connect the alarm directly to the access control panel, the access control system can manage and respond to alarm events more effectively and allows for centralized control and better coordination of access and security.
- Door contact sensor input: To measure if doors are open or closed, the panel typically can connect to a door contact sensor, which communicates with the panel if the door is open or closed. For example, Kisi’s Controller Pro 2 boasts 12 generic inputs that are configurable as either contact sensors or requests to exit.
Types of panels used in access control #
Real access control panels #
Like Kisi, most access control panel providers are board manufacturers who also provide complete access control solutions.
The Kisi Controller Pro Series, for instance, powers all kinds of spaces, from multi-location enterprises to private gyms as the first cloud system that works fully offline. It transforms spaces into commodities by pairing Kisi’s remote management with real-time occupancy insights.
Each Kisi access panel connects up to 4 doors, enabling you to connect and manage all locations from one online dashboard. Backed by the multiple integrations and open API, it can sync with any directory.
Many companies choose to add the Wiegand board to the Kisi controller to upgrade their on-premise systems and move them to the cloud. This empowers admins to grant or remove access anytime with the Kisi dashboard along with other functionalities.
Generic access panels #
Some security companies, and even some prominent access control brands, don’t manufacture their own access panels but white-label standard, commoditized hardware. Kisi designs and produces all hardware and software solutions, and continually updates them to comply with the latest security standards.
Alarm panels #
Alarm panels don’t have the same primary function as access panels – unlocking doors. Still, they can ensure nobody enters when they are not supposed to, meaning they can detect and respond to intrusion. To keep your assets secure, you can configure them to dial the police and send a prerecorded message when an intruder is present.
Watch the video below for more information on alarm panels, their benefits, use cases, and installation tips.
To detect intrusion, different tools including motion sensors, door contact sensors, and glass break sensors are used. Contact sensors allow the detection of any open door or window. Glass break sensors help detect forceful entries, while motion sensors notice movement within the secured space.
When the alarm panel detects an intrusion, it can set off sirens to alert you and call for help while initiating other emergency procedures. Connecting an alarm panel to Kisi gives you access to powerful cloud-based tools.
You can control when your alarm is armed, and you will get notified by email and mobile if the alarm is ever triggered. By combining your alarm system with your access control system, you can reduce false alarms and ensure your spaces are secure.
Kisi has built-in intrusion detection, but 3rd party alarm panels can also be integrated with the Kisi system to combine legacy intrusion detection with modern access control.
Installing an alarm panel with access control
Be sure to unplug the controller before wiring anything. To wire your alarm panel with Kisi, you need:
- Kisi Controller Pro 2
- Alarm panel
- Small flathead screwdriver
Hardware setup: Wiring the alarm panel
- Identify the general input pins on the left side of the Kisi Controller. The Alarm Panel will communicate to Kisi what mode it is in through these pins.
- Wire one of the general input pins to the disarm relay NO port on the alarm panel. Connect the COM port of this relay to a GND pin on the Kisi Controller.
- Wire another general input port to the violated relay NO port on the alarm panel. Connect the COM port of this relay to a GND pin on the Kisi Controller.
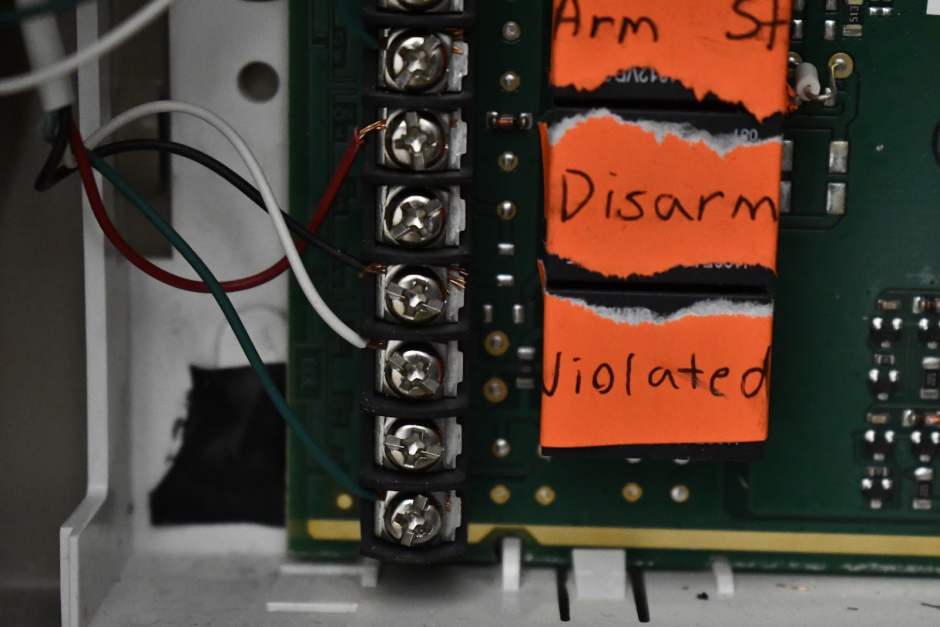
- Repeat this for the Armed Away relay on the alarm panel. If you wish to configure an Arm Stay mode as well, do this process a fourth time.
- Identify the relays on the right side of the Kisi Controller. The controller will communicate to the Alarm Panel when to arm/disarm through one of these relays.
- Wire the NO port of one of the relays to the key switch of the alarm panel. Wire the ground of the key switch to the ground of the Kisi relay. If the relay triggers for 0.5 seconds, the mode changes to arm away. If the relay triggers for more than 1 second, the mode changes to arm stay. If the relay triggers when the system is armed, the system mode will change to disarmed.
Software setup
Add a zone
- Sign in to Kisi.
- Open your place.
- In the left-hand menu, click on ‘Intrusion Detection’.
- Click on ‘Add Zone’.
- Enter the zone name.
- Open the ‘Alarm Type’ dropdown and select ‘3rd Party Alarm Integration’.
- Click ‘Save’.
Configure the zone
- Click on the zone you created following the steps above.
- Toggle on ‘Enable Intrusion Detection’.
- Scroll down and select the ‘Alert Policies’ tab.
- Enter the email address of the user who should be notified upon policy violation when the alarm is triggered.
- Click on the user to configure the notification preferences.
- Next, click on the ‘Alarm Controller’ tab.
- In the ‘Relay’ field, define the relay that is connected to your alarm siren.
- In the ‘Arming Delay’ field, define how long the alarm controller should wait before arming.
- Click ‘Save’.
- Next, click on the ‘Contact Sensors’ tab and configure it.
- Next, select the ‘Doors’ tab, and click on ‘Add Door’.
- Select the door you want to add. You can also enable ‘Exterior Door’ if the door is used to leave or enter the zone. Click ‘Add’.
- Next, click the ‘Away’ tab and select the ‘Action’ the relay must detect for the system to change to Away mode. Note: ‘Away’, ‘Disarmed’, and ‘Violated’ states must be connected to a contact sensor. The ‘Stay’ state is optional, depending on your alarm system requirements.
- In case of setting up the ‘Stay’ mode: Open the ‘Stay’ tab and define the amount of time the relay should be triggered to change the system mode to armed stay.
Trove panels #
Trove panels are access and power integration solutions offered by Altronix, designed to simplify the installation and management of access control systems.
The Altronix 16 Door Trove is an enclosure that can hold up to four Kisi Controller Pros, allowing you to control up to 16 doors simultaneously. The backplane arrives assembled with two 12 or 24 VDC @ 6A power supplies and two eight fuse-protected output access control modules. The enclosure is mounted on a wall and is made out of metal.
Watch the video below for more information on the Altronix door trove, its benefits, use cases, and installation tips.
The Altronix 16 Door Trove is great for large-scale spaces that need to secure many doors under unified access control. Setups that utilize multiple Kisi Controllers can consolidate four controllers into one enclosure, improving space efficiency and organization. The enclosure also accommodates up to four 12VDC batteries, enabling battery backup power in the event of a power failure.
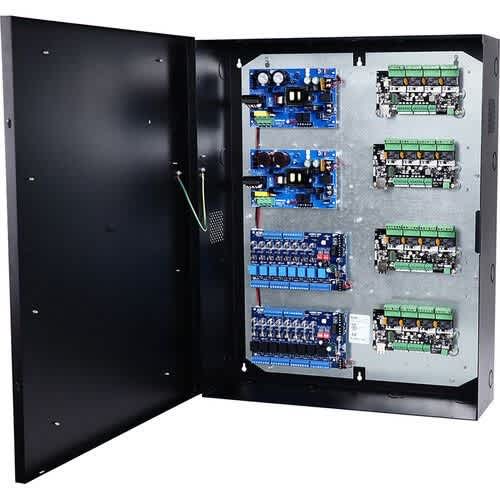
The Altronix 16 Door Trove offers a simplified board layout, making for easier installation if you need to configure a large number of Kisi Controllers. Boards are mounted onto a flat backplane, allowing for tidier wire management and organization. The modularity of the enclosure reduces installation time and overall labor cost.
Installing the Altronix 16 Door Trove with Kisi
The manufacturer’s manual offers detailed installation instructions. You can follow the steps below for a general overview of the installation.
- Remove the backplane from the enclosure.
- Mark and predrill holes in the wall. Install the screws and make sure to tighten all screws.
- If necessary, mount the included UL Listed tamper switch opposite of the hinge.
- Mount Kisi Pro Controllers to the backplane.
- Set the desired DC output by setting SW1 to the appropriate position on the power board.
- Connect unswitched AC power to terminals (L, N). 14 AWG for all power connections (Battery, AC Input, DC Output). 22 to 18 AWG for power-limited circuits.
- Measure output voltage before connecting devices.
- Connect devices to terminals marked [+ DC -].
- Optionally connect batteries to terminals [- BAT +].
- Connect signaling notification devices to AC FAIL and BAT FAIL.
- Power supply input: These units can be powered with one power supply or two power supplies. For this example, we are using one. Connect the output of the power supply to the terminals marked [- Power +].
- Output options are located at the bottom of the board. They support switched power, form c, and auxiliary (unswitched) power outputs. Attach output devices like maglocks and electric strikes - wire based on specifications for each device.
- Input trigger options are located on the top of the board. They support Normally Open input triggers or open collector sink inputs. Connect output relays on the Kisi Controller Pro to open input triggers on the ACM8. C on the Kisi Controller connects to GND on the ACM8. NO on the Kisi Controller connects to NO on the ACM8. Optionally wire other input devices like keypads and request to exit buttons to other inputs.