How to Install a Contact Sensor
Learn about contact sensors, their role in access control, and how to easily install them
Reading Time: 7 min
Share this lesson
Continuing our access control installation course, we’ll look at one of the add-ons that you can install to improve your security infrastructure — the contact sensor.
What is a contact sensor?
For a more in-depth dive into contact sensors, and their function, please check out this article on Kisi’s Academy page. Note that there are some magnetic locks that come with a built-in contact sensor — we won’t be covering those here as their installation is the same as a magnetic lock, covered in the third article in this series.
Wireless Stand-Alone Contact Sensors
These contact sensors generally operate on an IP basis, meaning that they have internet connectivity. They will be either stand-alone or connected wirelessly to your smart home or office suite.
Installing them is relatively straightforward: you simply have to screw or tape them onto the wall, and then activate them via the online web or mobile interface while logically signing them to a door. There are also some that are integrated directly into the door frame, though these are rarer and have a more involved installation process.
Wired Integrated Contact Sensors
Wired contact sensors are generally cheaper, and have to be integrated with an access control infrastructure for proper functioning.

As the article linked above mentions, contact sensors like this are essentially electromagnets, and when the door is opened, the current is interrupted. At that point, they send a signal back to the alarm panel to indicate this. To install these, you just need to screw them into the appropriate places on the door and frame, and run the wires to the panel on the wall.
How to Integrate a Contact Sensor With an Access Control Infrastructure
We’ll focus mainly on the second category of contact sensors here, the wired ones, and discuss how to integrate them with your overarching access control infrastructure, both from a software and from a hardware perspective.
Picking the Right Access Control
An important part of setting up your contact sensors is making sure that you’ve picked the right access control system for your needs. A proper one will make it easy for you to integrate them both on the hardware and the software side. If you’re going with a wireless contact sensor solution, then your best bet is probably a smart home automation system like Google Home or Amazon Alexa, but in this article we will focus on the more robust and complete IP access control systems like Kisi, and how to set up your contact sensors with them.
Installing (and Wiring) the Contact Sensors
If you’re opting for a modern access control system , you might want to go for the cheaper wired contact sensor options, given that the cloud-based infrastructure of the access control can handle all the communications, data storage, and analytics for you.
You will then need to install the contact sensor on your door, and run the wires to the access control panel. You should use low voltage 18/2 gauge wires here — speak to an installer about the particulars! Once the hardware is installed, you can move on to the software setup.
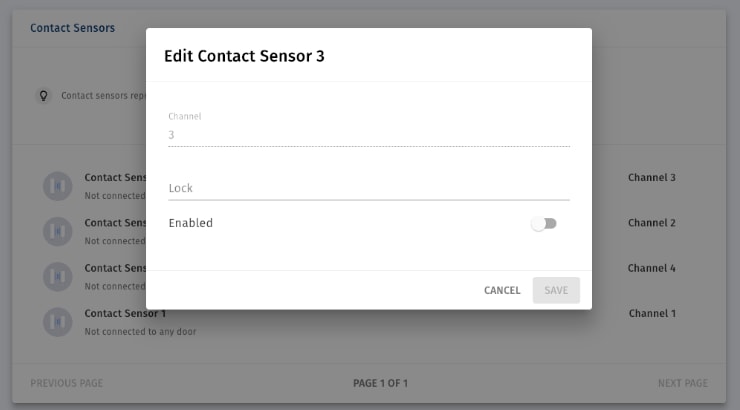
Setting Up the Software
Once you have the hardware set up and wired correctly, you can turn to the online platform of your access control provider and set up the contact sensors on the web or mobile interface. With a modern system, this is relatively straightforward to do: The contact sensor will appear as assigned to a location, and you can tell the system what the corresponding door and lock are, and the system takes care of the rest, providing you with updates on the status of the door and access data.
Testing
As always, you won’t want to neglect testing before writing off an installation as completed. Depending on the type of sensor, the process will be different, but for the wired and integrated solutions that we’ve covered here, this will involve opening and closing the door repeatedly, and ensuring that the status of the door is correctly displayed on the web interface of your access provider.
Tracking
Once you have the system set up and tested, you can commence tracking access events. You’ll be able to export these on a CSV sheet for good systems like Kisi, and if you’ve set up the contact sensor and programmed it properly, you’ll be able to tell which events are door openings and which are door closings.
In addition, you can wire them to alarms, namely door held open or forced open alarms. These sorts of alarms indicate exactly what you’d think, and contact sensors facilitate their tracking. For door held open alarms, if you overlay contact sensor data with access data, and see that there was a door opening event (contact sensor log) that doesn’t correspond with an unlock event (access log), then that indicates that the door was forced open without a proper unlock. For door held open alarms, the process is more straightforward: Just check to see whether the contact sensor indicates that the door was open for more than an appropriate amount of time (up to your discretion to determine what appropriate is).
Main Takeaways
Contact sensors are an important part of any complete access control system. If properly wired, they can give you data on door usage, and you can even set up alarms to let you know if it’s been propped open for too long, or if it’s being opened suspiciously often.