Lesson 1: Planning and setting up a multi-place environment with Kisi
An in-depth look at how to set up multi-place environments as a Kisi administrator.
Reading Time: 10 min
Share this lesson
The following lessons describe the outline needed to create an access control project and requirements plan. If you want a shortcut, here is a template you can use and follow along.
Ideally, this document includes:
- About us: Who is your company and what is the access project you’re looking to deploy?
- Needs: Access control in our x sqft building
- Needs: User profiles within the building. What types of users are on-site and what levels of access will they have? How many users will be there?
- Door planning overview (see “door & location” planning)
- Access control requirements
- Timeline
- Marked up floorplans
Let’s dive right in.
Topic 1: Access control location and installation planning
If you’re a new Kisi admin taking over ownership of an account, or just looking for a refresher, start off with an audit of your Kisi device floorplan and installation deployment playbook to set yourself up for success.
Planning your access control deployment requires several items:
- Door and location planning
- Floorplan markup
- Door and device labeling
- Project timeline
- Installation rollout playbook template
Door & Location Planning
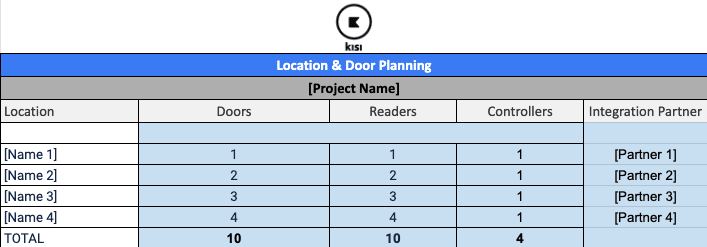
As administrator of your company’s Kisi account, you’ll need to identify how many doors at each location you want to have access control enabled.
You can use our “Door per location planning template” that shows locations, number of doors, and then calculates the number of readers and controllers needed. It is also recommended to add a section about which integration partner is used:
Floorplan Markup
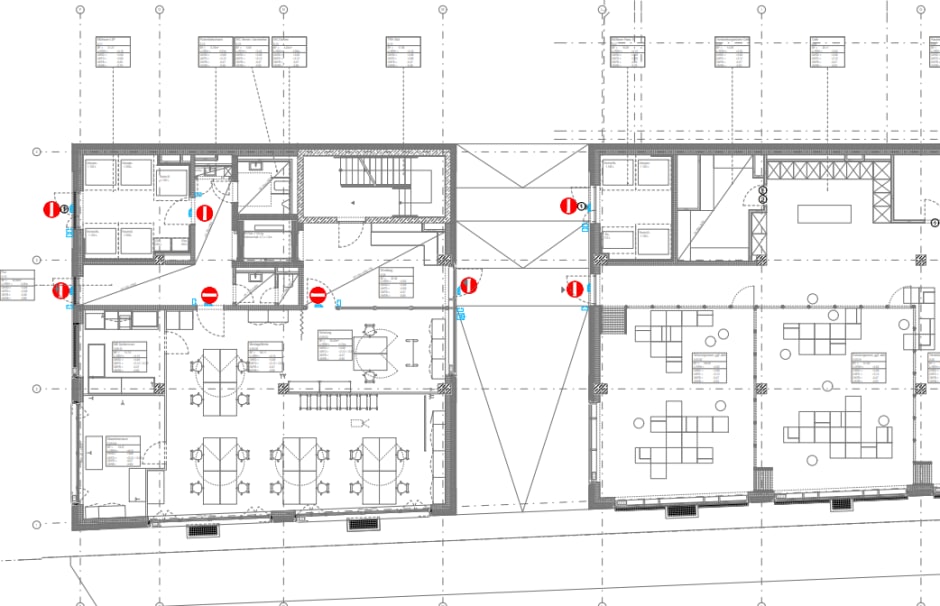
Adding Kisi devices to your floor plans will make it easier for everyone on the project - and construction team - to identify and be on the same page about what is installed where.
If you plan on having more than one Kisi-enabled door we recommend using a marked-up floorplan. This makes it much easier to correctly document and identify your doors, especially as you add new ones to your space. Later you can add device names to each door, so it’s easy for other team members to understand what is installed where.
Door and device labeling
Frequently overlooked but an important aspect of larger roll-outs is door and device labeling.
When you implement an effective labeling method, you can streamline and standardize deployments and maintenance of Kisi.
It’s important to develop a labeling method that you can keep using as you add more doors and devices to your spaces. When creating a labeling method, think about shared commonalities such as location (physical city, building name, floor) or type of door (conference, server, main, kitchen). To help you get started, we’ve created a template that you can use.
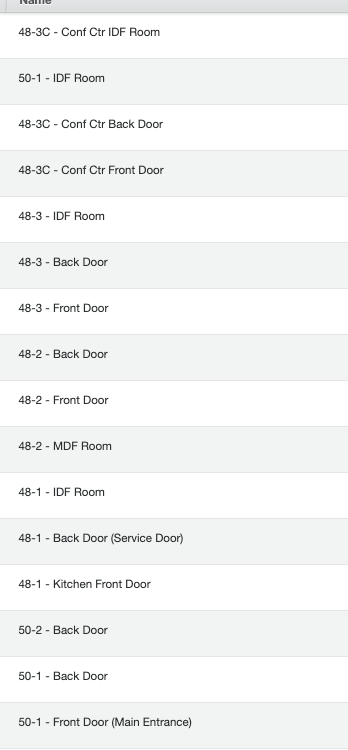
In our example here, we’ve used the address number, floor number, [ABC] and [door name] logic. So for example an IDF door on the 1st floor of address 50 would be: 50-1 - IDF Room.
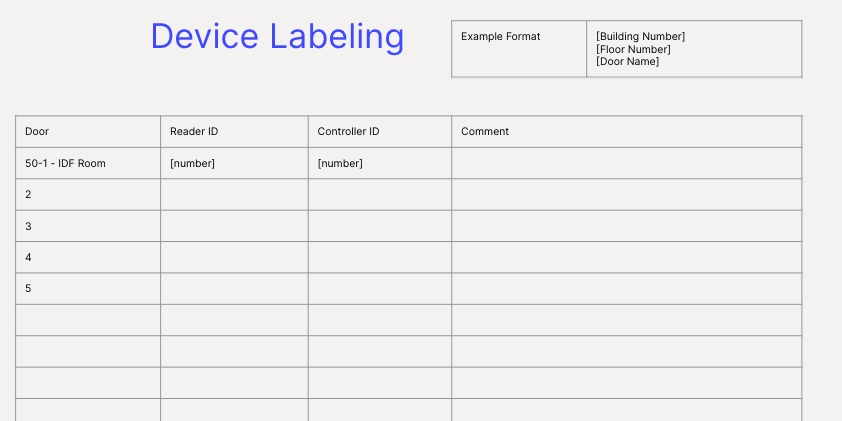
Here is an example of how a labeled door list could look:
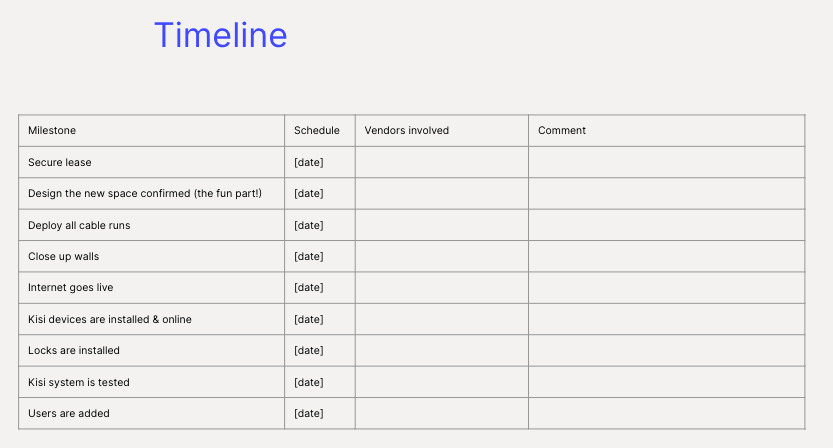
Project Timeline
Installation of Kisi across multiple locations can require different vendors and internal resources for the full project. It’s vital to take all these factors into consideration when developing a timeline for your project.
Some points you may consider addressing in your timeline:
- Project milestones
- Planned completion dates
- Vendors involved
Here is an example of how this could look:
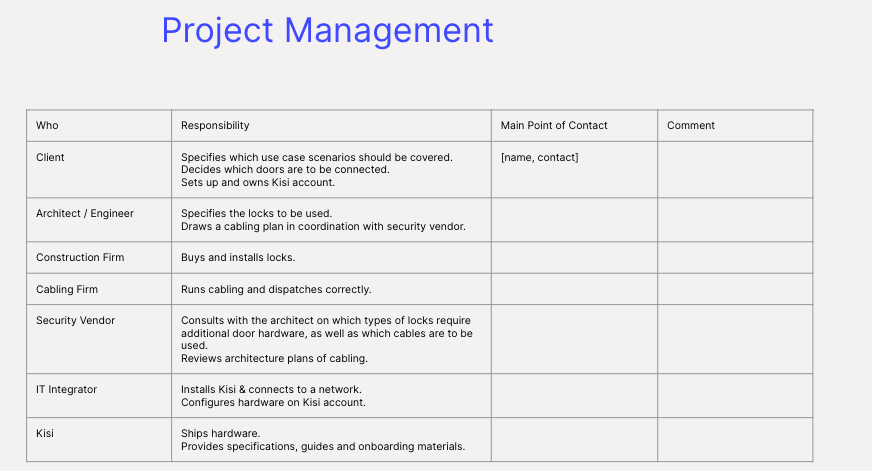
Installation roll-out playbook template
When planning to deploy Kisi at new locations, it is recommended that you create a small “playbook” of how you intend to roll it out. When developing your playbook, consider including the following information:
- Timeline expectation
- Responsibilities of the integrator
- Who will be the main point of contact during setup
- Who will set up and test the system
Here is a project management template to provide you an overview of the typical roles and responsibilities during an access control installation:
Topic 2: Admin Roles & Team Responsibilities
Admin Roles
When configuring your administration structure, it’s important to address your current needs while planning for future growth.
Kisi allows for flexible system administration with tiered administrator roles. Tiered administration roles allow you to set the appropriate level of permission and oversight for each administrator in your organization.
Organizations Owner
This role is the highest level administrator of an organization. Kisi recommends using a generic email address (it@company.com) to prevent loss of access if an employee is to leave your company in the future.
Organizations Administrator
This role has several of the same permissions as the Organizations Owner. When more than one user is assigned the Organizations Administrator role, Kisi recommends defining the responsibilities specific to each administrator and providing them with training appropriate to their role. If a managed service provider is involved in the installation and ongoing support of Kisi, it is recommended that they have the Organizations Administrator role to facilitate installation setup and troubleshoot reported issues.
Team Administrator
This role is able to access several of the same views as the Organizations Administrator but without access to the internal system setup including integrations, billing, doors, etc. If teams are being used on a departmental level, it would make sense for each team to have an administrator that can add and remove users and review event history for their team.
Organizations Manager
This role is similar to the Team Administrator role, but without access to manage restrictions for the place.
Administrator access levels of each role can be viewed here
Support Escalation Matrix
Now that you’ve defined your administrators and their responsibilities, you’re ready to create your escalation matrix. The purpose of an escalation matrix is to outline for your users how they can report an issue and improve response time.

When creating an escalation matrix, think about the level of knowledge each person in the matrix is required in order to be effective. Will the team administrators be responsible for problem-solving or problem reporting? Is your organization working with a managed service provider for ongoing support?
Download your copy of the escalation matrix template here
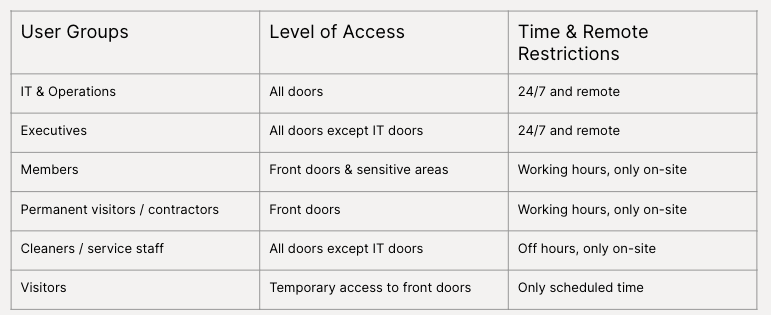
Teams Permission Planning
Setting up permissions across multiple teams can be easily planned out in advance by understanding the type of access each team requires and creating an access level overview.
To create an access level overview, you will first need to discuss with each of your team leads the level of access required for people on their team. Some permissions you may consider addressing with your team leads to include in your plan:
- Level of door access
- Access hours
- Credential types
- Reader restrictions
Read more about Kisi’s restriction here.
Here is an example of an access control permission overview which you can also find in this template.
Teams Permission Auditing
Creating an audit schedule to review permissions by members and teams will allow team leads and administrators to update or remove outdated permissions. Many companies perform member audits on a monthly basis.
Kisi provides out-of-the-box reporting on access privileges, role, and last access date to make your life easier. The easiest way to audit your teams’ permissions is to create a member export:
Topic 3: Security restrictions
Kisi allows you to set different types of restrictions to ensure that you have full control over who is accessing your space and when. Let’s take a look at the types of permissions and restrictions you can grant:
Door specific security settings
Door-specific security settings apply to all users including the Organizations Owner and will take precedence over team restrictions.
- Geofencing restriction: ensure unlocks from the Kisi app can only take place when a user is within a certain distance of the door. The default distance is set at 300 meters but it can be customized by the administrator.
- Reader restriction: ensure someone is really in front of the door when trying to unlock with this restriction. With Bluetooth built-in, the Kisi Reader is able to “sense” whose phone is near and only allows unlocks from phones in the immediate vicinity.
Team specific security settings
Team-specific security settings apply to all users of the team and will be secondary to door restrictions. Instead of setting the same restrictions for a door used by all users, you can apply them to a team. This will allow you to set customized security rules by team. In addition to geofence and reader restrictions, the following team restrictions are also available:
- Primary device restriction: ensures users can only use one specific device for accessing your space. If a user installs the Kisi app on a second device, for instance a tablet, they will not be able to use it when activated.
- Time restriction: grant or revoke access during specific time periods, which can be set on a recurring basis (for instance, Monday-Friday from 9AM to 6PM) or as one off events.
Reader specific security settings
Reader-specific security settings allow you to enforce stricter security policies.
- Two-Factor Authentication: when enabled, users are required to unlock their phones when tapping the Kisi reader connected to this door. This setting cannot be combined with the MotionSense restriction.
- Reader Buzzer: when enabled, the reader will make an audible noise after each unlock.
Often we see admins set the restrictions only on the team level to give administrators full flexibility in using the system 24/7 from anywhere. This is of course dependent on company policy and can be restricted by adding security restrictions on the door level which will be enforced for all users.
Topic 4: Reporting
Kisi administrators create access reporting for a variety of reasons including compliance reporting, occupancy reporting, health reporting, or attendance reporting. The main driver for these reports is what we at Kisi call “events”.
Events
An event is a Kisi-related activity that occurs within an organization and its resources. A door being unlocked, access being shared to a user, a scheduled unlock starting, a door forced open and other actions will be recorded as events. Kisi logs close to 100 events which are listed in our product documentation.
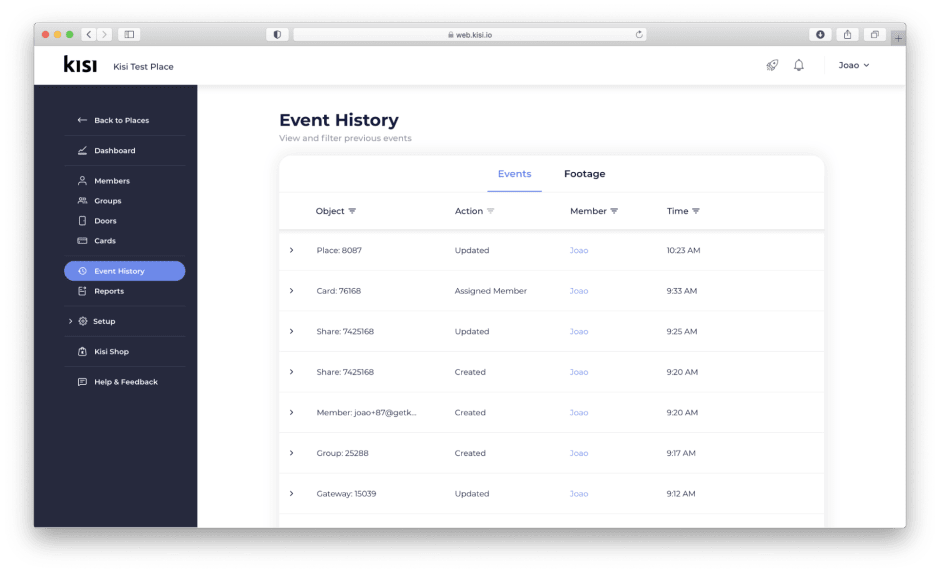
Event History
The event recording is called Event History (or Event Log) and it will save the member responsible for the event, the event that occurred, and the date and time of it. This Event History is easily accessible from the admin dashboard, which gives the Administrators an audit trail with a highly granular level of detail to allow for tracing security-related events back to their source. The Event History page will show the last 100 events for each place. The advanced filters can be used to narrow down those results.
Event Exports
The option Event Exports allows obtaining a longer history of events. This will download a .csv file with the last 10,000 events. Once the .csv file has been downloaded, the document can be filtered to search for a member email address, lock, etc.
Forward Kisi’s Events via API
Kisi provides support for forwarding events to external third-party services. The Event Webhook integration triggers whenever an event is added to the activity stream of a Place. The raw JSON can be forwarded to an external service via a webhook URL. Using API to export to your SIEM (Splunk, Sumo Logic, etc).
Members
Members represent people that make use of the Kisi system. They can be created from the Members tab in the admin dashboard, or when added to a place or group. The only requirement needed is a valid email address. When members are created, Kisi also creates a user profile based on that email address. Members can be added to as many places as necessary.
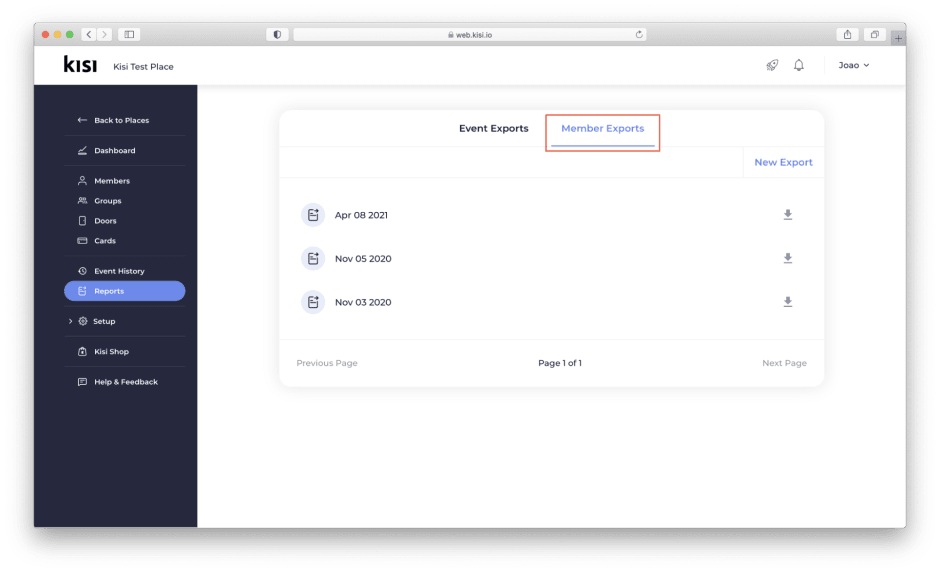
Member Exports
Member exports can enhance your permissions audit process as Kisi reports on data relevant to assessing every user’s access including user’s role, group, and last access dates.
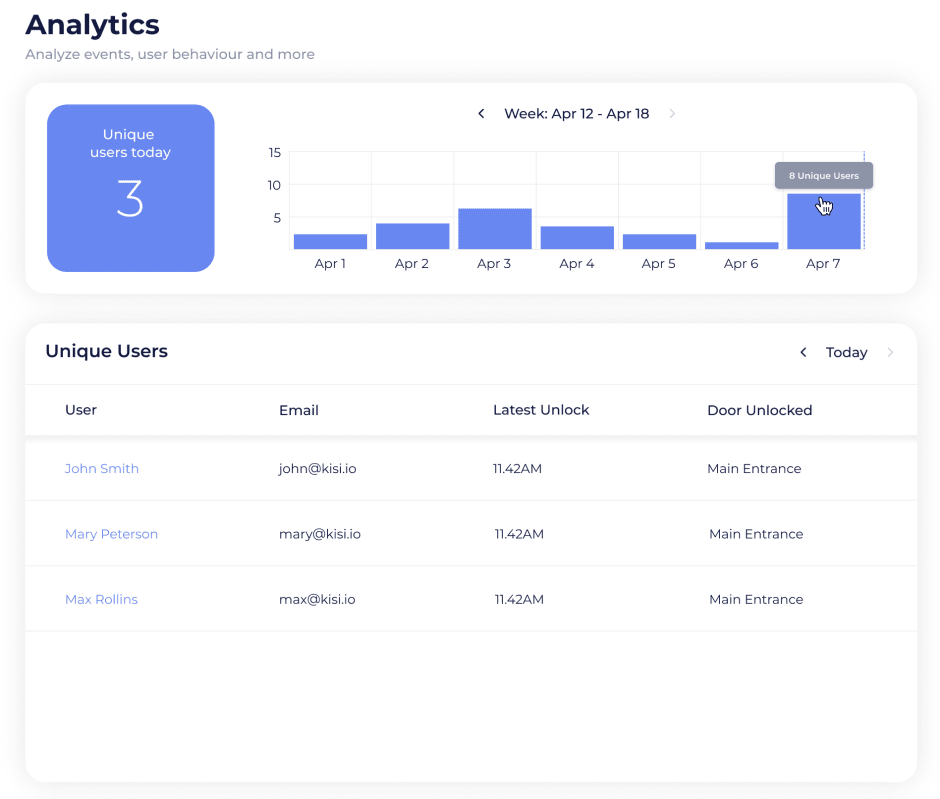
Place Member Analytics
The analytics page will provide a quick view of the unique users that have been active during the present day, a summary of the unique users distributed on the days of the current week, in addition to the latest unlocks of the day, by user, and a quick access link to the user's profile. Data from previous weeks is also available.
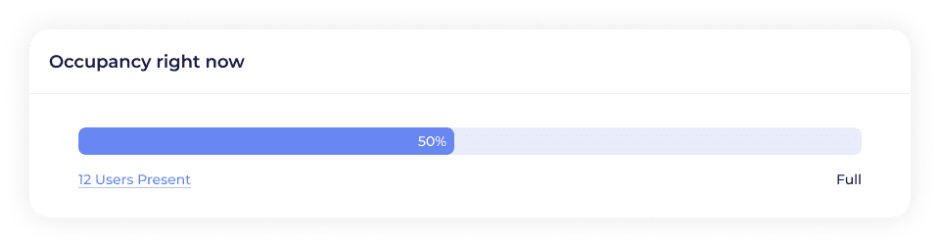
Member Occupancy Reports
With the Capacity Management feature, you can maximize space usage without compromising security or safety. Capacity Management updates your Kisi account with real-time space utilization data. Additionally, you can receive real-time notifications when capacity reaches 75%, 100%, and 150% using alert policies.