How to Install a Push-to-Exit Button
Learn about push-to-exit buttons, how to install them, and their role in access control
Reading Time: 10 min
Share this lesson
Following contact sensors, we’ll take a look at another nifty (and sometimes legally required) product you can add to your physical security infrastructure: Push-to-exit buttons, also sometimes known as request-to-exit buttons.
In case you need further information on the uses of push to exit buttons, check here our guide on door release buttons.
What the Push-to-Exit Button Does
A push-to-exit button does exactly what its name describes: It allows you to exit when you push it, if your door doesn’t open with traditional handles. It is a button installed on the inside of a room, and is wired to the electric lock equipped on the door. Note that for the button to be able to serve its purpose, the door on which it’s installed needs to have an electronic lock. When the button is activated, it sends a signal to the lock and the corresponding lock opens.
There are two main types of push-to-exit buttons. The first of these is the classic button that you mount on a door frame or near a door, and the second is a motion sensor and takes the word “button” quite liberally. Both the push-to-exit and motion sensor “buttons” can be used for securing doors that can't be unlocked with a regular lock or deadbolt. These buttons are for doors that are locked permanently and can only be opened by the exit sensor or push-to-exit button.
Wall-Mount Push-to-Exit Buttons
If you’ve ever seen a physical push-to-exit button, you’ve likely seen it mounted on a wall close to the door. You’ve also likely seen a model from the biggest manufacturer, Seco-Larm Enforcer brand push-to-exit buttons.
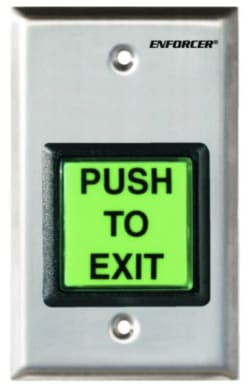
These are installed inside a door (usually on the door frame), and when you push it, they trigger the lock to release and open the door. These are generally illuminated (backlit) as well so that they can be found in emergency situations.
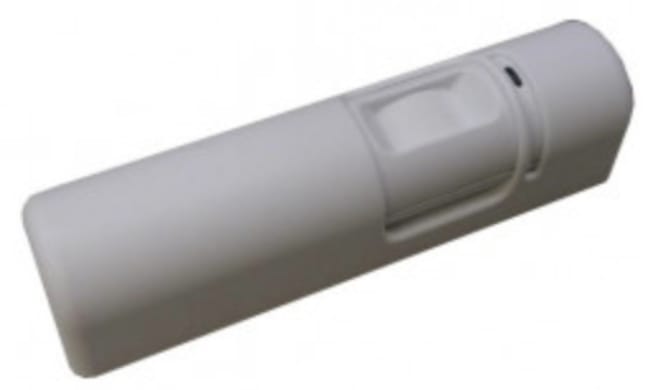
Motion Sensors
Motion sensors can take over the job of push-to-exit buttons. They are mounted right over the door at the inside of the door frame. They detect when somebody approaches the door, and will deactivate the lock, allowing you to exit the space. These are well suited to larger offices where people are exiting the door often, as it streamlines the flow of traffic in and out.
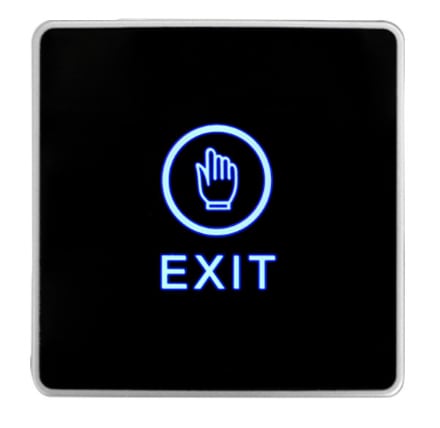
The Other Cousin: Touch-to-Exit Buttons
There is actually a third kind of push-to-exit button — Touch to exit buttons. These are often included in the same category as push-to-exit buttons since their functionality is exactly the same, but they are distinct. However, we would recommend veering away from them and sticking to the classic push-to-exit buttons. Despite their aesthetic appeal and sleekness, these buttons are often unreliable (as touch screens tend to be), and you want something that will respond immediately and let people move in and out unhindered.
How to Set Up a Push/Request-to-Exit Button With Access Control
In this section, we will go over setting up your push-to-exit button with your access control. We will focus mainly on the wired physical push-to-exit buttons, rather than motion sensors, and on modern IP-based access control systems like Kisi. We’ve found this combination to be most effective for offices and facilities of all sizes. The installation is essentially the same for motion sensors, though!
Picking the Appropriate Lock Mechanism
A request-o-exit button is most appropriate with a fail-safe lock mechanism like an electric strike or magnetic lock. A fail-safe lock is one that unlocks when the power is out (and remains locked when supplied with power), whereas a fail-secure lock will remain locked when the power is out. This means that a fail-secure lock by necessity will have a manual way of being opened, like a door handle or knob (we call this the lockset). However, on a fail-safe lock, you’ll be granted access to the door by some electronic mechanism (like access control), so you can use a push-to-exit button for exiting).
Picking a Power Supply
You may have a few options for a power source during your installation. The main options are generally an external power supply or the access controller’s dedicated power outputs, like the Kisi Pro Controller’s power outputs.
It’s generally recommended that you always power your ancillary components based off of an external power supply. An external power supply is more likely to provide the amperage you need, and you can fine-tune it more easily. For instance, for Kisi specifically, if you pull more than four amps through the Kisi Controller, the board will short circuit. Nevertheless, if you are in a situation where you do not have a power supply on hand and need to power a small amount of ancillary components (for, say, a single push-to-exit button and one contact sensor, depending on the model), you can elect to use the power outputs located on the Kisi Controller.
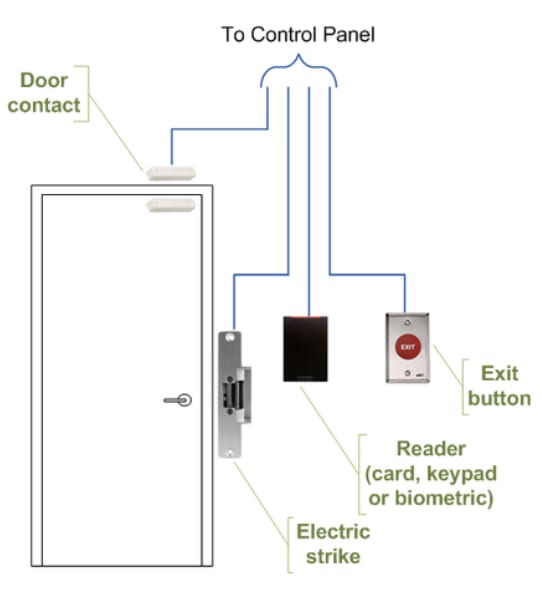
Wiring the Components
A crucial step in setting up your push-to-exit button is properly wiring all the components. In an IP system like Kisi, this will involve the door lock, the access reader, the controller, the power supply, and the push-to-exit button (as well as optional contact sensors). The following diagram outlines the setup with an electric strike lock. The “control panel” in question comprises an access controller and a dedicated power supply.
The typical REX button has 5 wires, (+, -, COM, NO, NC), although only 4 are needed for normal operation. Two wires (+, -) will power the LED on the button for the backlight, and two wires (C-NC or C-NO) will serve as signal wires that connect to the rest of your installation components (lock, reader, other components).
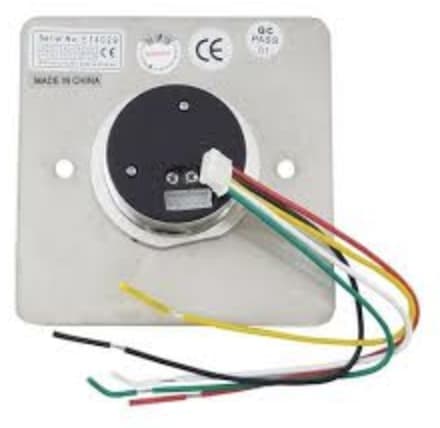
Note: + and - can sometimes be labeled as LED+ and LED- but are essentially the same.
If you are not completely familiar with installing REX buttons, we’d recommend contacting an installer to do this professionally. Alternatively, we’d recommend making your wire connections one pair at a time. The easiest connection order is as follows:
1) Connect and power the LED on your REX button
Connect + and - on the REX button to power the LED light using a 12/24V power supply. When you plug in the power supply, you should see the LED light of the button turn on. If the button does not light up, you may have to observe the polarity of the LED. Swap the wires on the button’s terminals and plug in the button again to test.
2) Connect the circuit signal wires to Common (COM) and Normally Closed (NC)
If you are wiring a fail-safe lock, you must maintain a closed (Series) circuit to continuously power your lock. From the COM port on the REX, connect to the positive lead of your power supply. From the NC port on your REX, connect to the COM of the next hardware component in the circuit. This could be a motion sensor, maglock, or Kisi reader.
In order to test this connection, you will need to wire the button to power.
3) Connect and power the REX button itself (separate from the LED in step 1)
This connection will provide power to your REX button. Connect the negative terminal from your REX button to the negative lead from your power supply. Then, connect the positive terminal from your REX button to the positive lead from your power supply.
When you plug your power supply back in, the LED of the button should turn on. As long as you’ve completed the rest of your circuit, when you press the button, it should open your circuit and release the door lock.
Setting up the Software
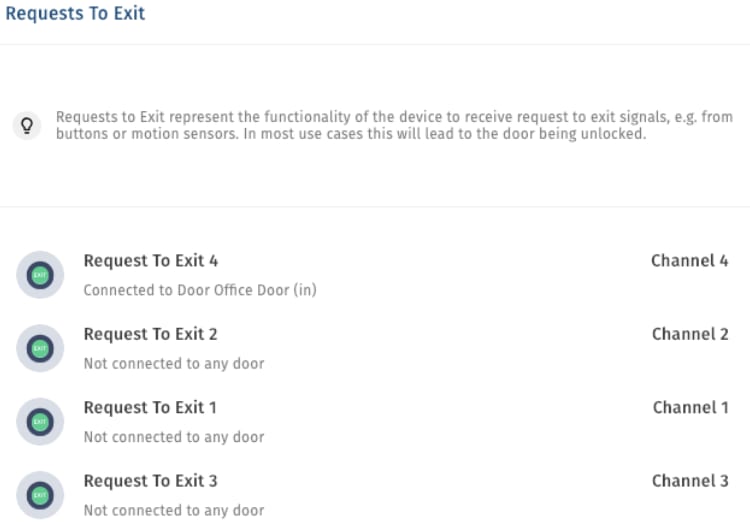
Once the components are all wired, you’re all set to use the button normally (testing notwithstanding). However, if you’re using a modern system like Kisi, odds are your provider can give you good data analytics on door usage. What this setup consists of is merely telling the system which contact sensor is connected to which door, and the provider will do the rest.
Testing the Setup
As usual, this is the essential final step in any installation. If the button does not release the door as it should, a failure in the controlling circuit is likely preventing power from being interrupted to the lock. It could be a shorted wire in a power transfer, or some other failed device in the circuit.
To identify the issue, you should test each option to open the circuit. In most cases that will be the reader, push-to-exit button (or motion sensor), and controller. If you can open the circuit with other components, then you can narrow down your issue.
Assuming the issue exists with the REX button, you should double check all of your connections. Make sure you observe polarity in your power connections and make sure your signal wires are connected to the proper terminals (NC and COM). If the issue still persists, the push-to-exit button may be damaged and you should consider installing a new button.
Closing Thoughts
Push to exit buttons are integral parts of any access control system with fail safe locks. While you can get by without them, it’s generally recommended for ease of access and flow of traffic, and with a relatively simple setup, it not too much of an investment!